Getting started
Get started with Magnum using a bootstrap project.
Setting up a new project can be pretty gruesome and nobody likes repeating the same process every time. Magnum provides "bootstrap" project structures for many target uses with the essentials and best practices laid out. This guide, as well as Magnum itself, uses the CMake build system.
1. Download the bootstrap project
The bootstrap repository is located on GitHub. The master branch contains just a README file and the actual bootstrap projects are in various other branches, each covering some particular use case. For the first project you'll need the base branch, which contains only the essential files. Download the branch as an archive and extract it somewhere:
1a. Option A: add Magnum as a CMake subproject
The easiest option to start without having to install anything is adding all dependencies as CMake subprojects. While it has an advantage of making your project nicely self-contained, it'll make your full rebuild times longer compared to magnum installed separately. For an alternative, see 1b. Option B: install Magnum separately and let CMake find it below. Clone the Corrade and Magnum sources like this (or use git submodule add, if you already have a Git repository):
cd /path/to/the/extracted/bootstrap/project
git clone https://github.com/mosra/corrade.git
git clone https://github.com/mosra/magnum.git
Then open the CMakeLists.txt file in the root of the bootstrap project and add these two new subdirectories using add_subdirectory() so the file looks like below. The EXCLUDE_FROM_ALL argument ensures only the parts you actually use are built (and excludes the subdirectories from the install target as well).
cmake_minimum_required(VERSION 3.5...3.10)
project(MyApplication)

set(CMAKE_MODULE_PATH "${PROJECT_SOURCE_DIR}/modules/" ${CMAKE_MODULE_PATH})

# Add Corrade as a subproject
add_subdirectory(corrade EXCLUDE_FROM_ALL)

# Add Magnum as a subproject, enable Sdl2Application
set(MAGNUM_WITH_SDL2APPLICATION ON CACHE BOOL "" FORCE)
add_subdirectory(magnum EXCLUDE_FROM_ALL)

add_subdirectory(src)
The last missing piece before you can continue is the SDL library — the bootstrap project (and most examples) use it to do window management and event handling. If you are on Linux or macOS, you can get it easily from your package manager:
sudo pacman -S sdl2             # on ArchLinux
sudo apt install libsdl2-dev    # on Ubuntu / Debian
brew install sdl2               # on macOS (via Homebrew)
If you are on Windows, by far the easiest is to bundle the prebuilt binaries into your project. Depending on whether you use Visual Studio or MinGW, download either SDL2-devel-2.30.9-VC.zip or SDL2-devel-2.30.9-mingw.zip, extract the archive to root of the project and tell CMake where it is by adding the SDL2-2.30.9 directory to CMAKE_PREFIX_PATH:
...

set(CMAKE_PREFIX_PATH ${PROJECT_SOURCE_DIR}/SDL2-2.30.9 ${CMAKE_PREFIX_PATH})
set(MAGNUM_WITH_SDL2APPLICATION ON CACHE BOOL "" FORCE)
add_subdirectory(magnum EXCLUDE_FROM_ALL)
This is of course not the only possibility — if you don't feel like bundling the binaries, you can put them outside of the project and then specify CMAKE_PREFIX_PATH externally on the command line.
1b. Option B: install Magnum separately and let CMake find it
An alternative to the above is building & installing Magnum separately. Both approaches are equally-well supported and each has its pros and cons — the subproject way shines when experimenting or when the project is developed on multiple workstations by multiple developers and you need to ensure the dependencies are the same version everywhere; while the separate installation makes sense when you have multiple projects depending on Magnum and want to integrate new upstream changes without having to update and compile it several times.
If you are lucky, you may already have Magnum packages ready for your platform:
- ArchLinux packages
- Packages for Debian, Ubuntu and derivatives
- Packages for Fedora, openSUSE and other RPM-based Linux distributions
- Homebrew formulas for macOS
- Gentoo Linux ebuilds
- MSYS2 packages
- CMake Package Manager / CPM
- Vcpkg package
If you cannot use a package, follow the manual building guide for Corrade and Magnum to build & install everything; don't forget to enable MAGNUM_WITH_SDL2APPLICATION when building Magnum so the bootstrap project can correctly find and use it. This is "the hard way" and it's recommended only if you have at least some prior experience with building projects from source using CMake.
Compared to Option A, you don't need to clone the subprojects and modify the CMakeLists.txt file, however you'll need to set CMAKE_PREFIX_PATH if you installed Corrade and Magnum to a non-standard location (i.e., anything else than /usr or /usr/local on Unix systems, and outside of the standard prefix if using MinGW on Windows).
2. Review project structure
The base project consists of just five files in two subfolders (plus the three extra directories with dependencies you might have added):
modules/FindCorrade.cmake
modules/FindMagnum.cmake
src/MyApplication.cpp
src/CMakeLists.txt
CMakeLists.txt
In root there is the project-wide CMakeLists.txt, which you have seen above. It just sets up project name, specifies module directory and delegates everything important to CMakeLists.txt in the src/ subdirectory.
The modules/ directory contains CMake modules for finding the Magnum dependencies. These are mainly useful with externally installed dependencies (Option B above), less so for the CMake subproject setup. You don't strictly need them as they're part of the Magnum installation, but if they're present, they provide a much better failure diagnostic in case Magnum cannot be found at all. These files are verbatim copied from the modules/
The src/ directory contains the actual project. To keep things simple, the project consists of just a single MyApplication.cpp file with the most minimal code possible:
#include <Magnum/GL/DefaultFramebuffer.h>
#include <Magnum/Platform/Sdl2Application.h>

using namespace Magnum;

class MyApplication: public Platform::Application {
    public:
        explicit MyApplication(const Arguments& arguments);

    private:
        void drawEvent() override;
};

MyApplication::MyApplication(const Arguments& arguments):
    Platform::Application{arguments}
{
    // TODO: Add your initialization code here
}

void MyApplication::drawEvent() {
    GL::defaultFramebuffer.clear(GL::FramebufferClear::Color);

    // TODO: Add your drawing code here

    swapBuffers();
}

MAGNUM_APPLICATION_MAIN(MyApplication)
The application essentially does nothing, just clears the screen framebuffer to a dark gray color and then does buffer swap to actually display it on the screen. The src/CMakeLists.txt file finds Magnum, creates the executable and links all needed libraries to it:
find_package(Magnum REQUIRED GL Sdl2Application)

set_directory_properties(PROPERTIES CORRADE_USE_PEDANTIC_FLAGS ON)

add_executable(MyApplication MyApplication.cpp)
target_link_libraries(MyApplication PRIVATE
    Magnum::Application
    Magnum::GL
    Magnum::Magnum)
The CORRADE_USE_PEDANTIC_FLAGS property enables a set of useful compiler warnings. It's not required, but recommended to enforce good C++ coding practices.
3. Build the project
Linux, macOS and other Unix-based OSes
The application along with the subprojects is built using the following three commands — create an out-of-source build directory, run cmake to generate a project with a debug build type and then build everything.
mkdir -p build && cd build
cmake -DCMAKE_BUILD_TYPE=Debug ..
cmake --build .
By default, CMake generates Makefile projects on Unix platforms. You can change that to for example Ninja by running CMake with -G Ninja; on macOS you can generate an Xcode project in the build directory using -G Xcode. If you have CMake 3.15 or newer, the default generator can be changed using the CMAKE_
Windows
On Windows you can use either Visual Studio or MinGW-w64. With Visual Studio the most straightforward way to generate the project file is by executing the below two commands in the Developer Command Prompt, you can also use CMake GUI — navigate it to the source directory, create a fresh build directory, select a generator and press Configure and Generate.
mkdir build && cd build
cmake ..
Once that's done, open the MyApplication.sln project file generated by CMake in the build/ directory (or in the CMake GUI, use the Open Project button).
With QtCreator just open project's root CMakeLists.txt file. It then asks you where to create build directory, allows you to specify initial CMake parameters and then you can just press Configure and everything is ready to be built.
4. Run the application
If you went with the CMake subproject approach (Option A above), the project is configured to place all binaries into a common location — the application will be placed in Debug/bin/MyApplication (on Windows along with all DLLs it needs), and libraries into Debug/lib; if you switch to a Release build, it'll be Release/bin instead. If you went with externally installed Magnum, the executable gets placed into its default location in src/MyApplication and dependency libraries stay where CMake found them — on Windows you might need to adjust %PATH% to make the application run.
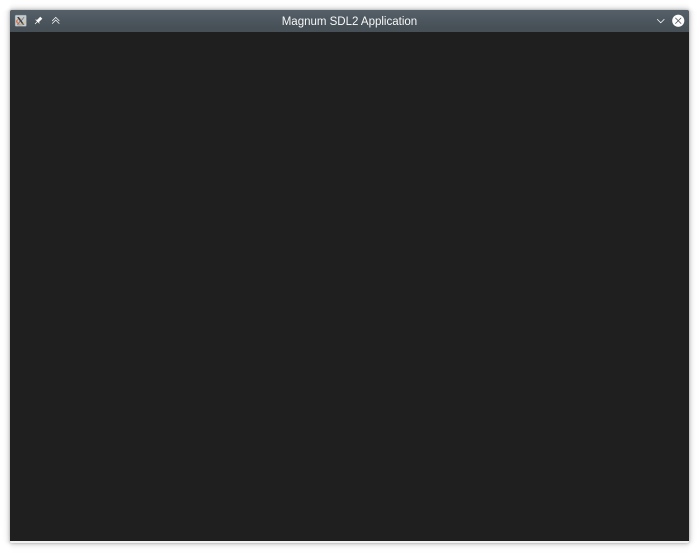
Once built, if everything went well and the application starts, you will see a blank window like this:
Now you can try to change something in the code. Without going too deep into the concepts of graphics programming, we can change the clear color to something else and also print basic information about the GPU the engine is running on. First include the needed headers:
#include <Corrade/Containers/StringView.h>
#include <Magnum/GL/Context.h>
#include <Magnum/GL/Renderer.h>
#include <Magnum/GL/Version.h>
#include <Magnum/Math/Color.h>
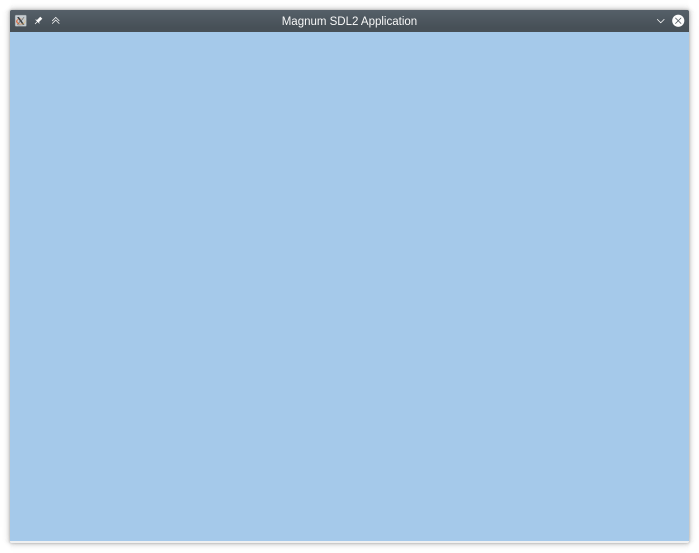
And in the constructor (which is currently empty) change the clear color and print something to debug output:
MyApplication::MyApplication(const Arguments& arguments):
    Platform::Application{arguments}
{
    using namespace Math::Literals;

    GL::Renderer::setClearColor(0xa5c9ea_rgbf);

    Debug{} << "Hello! This application is running on"
            << GL::Context::current().version() << "using"
            << GL::Context::current().rendererString();
}
After rebuilding and starting the application, the clear color changes to blueish one and something like this would be printed to the console:
$ ./MyApplication
[...]
Hello! This application is running on OpenGL 4.5 using GeForce GT 740M
The barebones application accepts various command-line arguments, pass --magnum-help to see them all. Depending on your platform, these can adjust HiDPI scaling, enable GPU command validation or for example switch to a different GPU device.
Using GLFW and other toolkits instead of SDL2
By no means Magnum forces you to use SDL2 — it's only the default. If you want to try it with other toolkits such as GLFW or Qt there are similar projects in other branches of the bootstrap repository. If you download base-glfw.zip, you get a GLFW-based project. It's mostly the same, with only minor differences. Enable MAGNUM_WITH_GLFWAPPLICATION instead of MAGNUM_WITH_SDL2APPLICATION, on Linux or Mac install one of the following packages:
sudo pacman -S glfw-x11         # on ArchLinux
sudo apt install libglfw3-dev   # on Ubuntu / Debian
brew install glfw               # on macOS (via Homebrew)
On Windows download either glfw-3.4.bin.WIN32.zip or glfw-3.4.bin.WIN64.zip, extract it to root of the bootstrap project and point CMAKE_PREFIX_PATH to it:
...
                                       # or glfw-3.4.bin.WIN32 here
set(CMAKE_PREFIX_PATH ${PROJECT_SOURCE_DIR}/glfw-3.4.bin.WIN64 ${CMAKE_PREFIX_PATH})
set(MAGNUM_WITH_GLFWAPPLICATION ON)
add_subdirectory(magnum EXCLUDE_FROM_ALL)
The rest is very similar to above. With the Platform::*Application classes, Magnum tries to have a common API for all toolkits to make switching from one to another easy, allowing you to choose the best fit for a particular platform. See Platform support for more information.
Follow tutorials and learn the principles
Now that you have your first application up and running, the best way to continue is to get familiar with the basic workflows and render your first triangle. Then you can dig deeper and try other examples, read about basic building blocks in the documentation and start experimenting on your own!
Additional information
- Downloading and building — Guide how to download and build Magnum on different platforms.
- Downloading and building plugins — Guide how to download and build plugins for the Magnum engine.
- Downloading and building integration libraries — Guide how to download and build integration libraries for the Magnum engine.
- Downloading and building extras — Guide how to download and build extras for Magnum engine.
- Downloading and building examples — Guide how to download and build examples for the Magnum engine.
- Usage with CMake — Guide how to find and use Magnum with the CMake buildsystem.
- Plugin usage with CMake — Guide how to find and use static Magnum plugins with CMake build system.
- Integration library usage with CMake — Guide how to find and use Magnum integration libraries with CMake build system.
- Extras library usage with CMake — Guide how to find and use Magnum Extras with CMake build system.
- Single-header libraries — Magnum functionality exposed in easy-to-integrate single-header libraries.
- Using Magnum with custom buildsystems — Guide and troubleshooting when you don't want to use CMake.